At the time of writing this, I’ve had two Pixel 3XL and three Pixel 3 come across my desk, with a poor batting average for reliability. Failing front cameras, USB-C port issues, and now compromised IP68 rating resulting in a device failure. I enjoy the use of this product, however my confidence in reliability and build quality is wavering.
The adventures of my current Pixel 3XL (a warranty replacement from my prior due to a USB-C issue) start with an accidental introduction to what should have been a tolerable amount of water (<1m, <1min). It appears upon further investigation that the ‘Refurbished’ units delved out by Google and [in my case] Verizon have likely been opened up from factory, and as such no longer meet their claimed IP68 rating. The entire rear glass (the point of access) is glued in place with a complex perimeter of elastomeric black tape goo that I wouldn’t expect to seal right unless new on the factory floor. While achieving access to the internals wasn’t too bad, I suspect my experience was unique with this unit being ‘refurbished’.
Post moisture exposure, realizing what had happened and that the phone WAS in fact upset and water had reached the internals, I immediately powered it down and started shaking water out of the handset. Removing the SIM card tray helped significantly with this process as it has a gasket on the outside edge of the tray, meaning the SIM card lives inside the protected environment. A remarkable amount of water came out of the phone (bad enough that when shaking could hear it sloshing around). No water was visible at the screen level however all cameras, flash, and other sensors were clearly wet.
I placed the handset in the usual bag of rice, not realizing that said rice was apparently already exposed to moisture. Adding a 25W incandescent desk lamp above the rice+handset bag to help with the process showed me just how damp the rice already was.
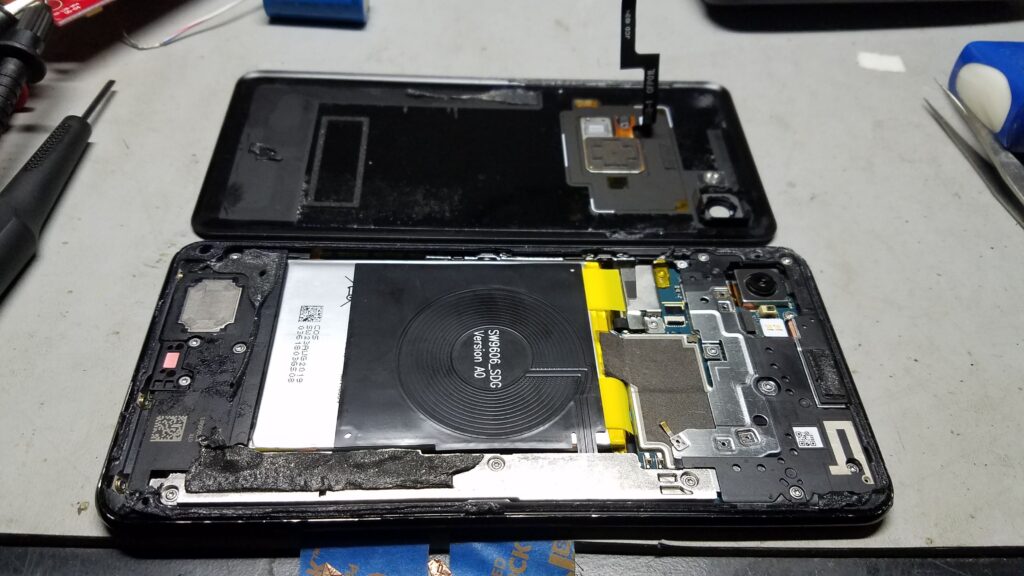
Giving up on the rice, and realizing that the moisture was just moving around inside the handset, I decided to remove the back glass and see if I could help the process along. A little poking online informed me that a good heat gun and some gentle prying around the perimeter opposite the buttons will allow the back to come free and hinge on the opposing side (where the cable for the fingerprint sensor moves up). Some improper tool usage and a hot handset later, it came free. Lifting a small piece of Kapton tape and a FFC connector toggle allowed me to unplug the fingerprint sensor and remove the back completely.
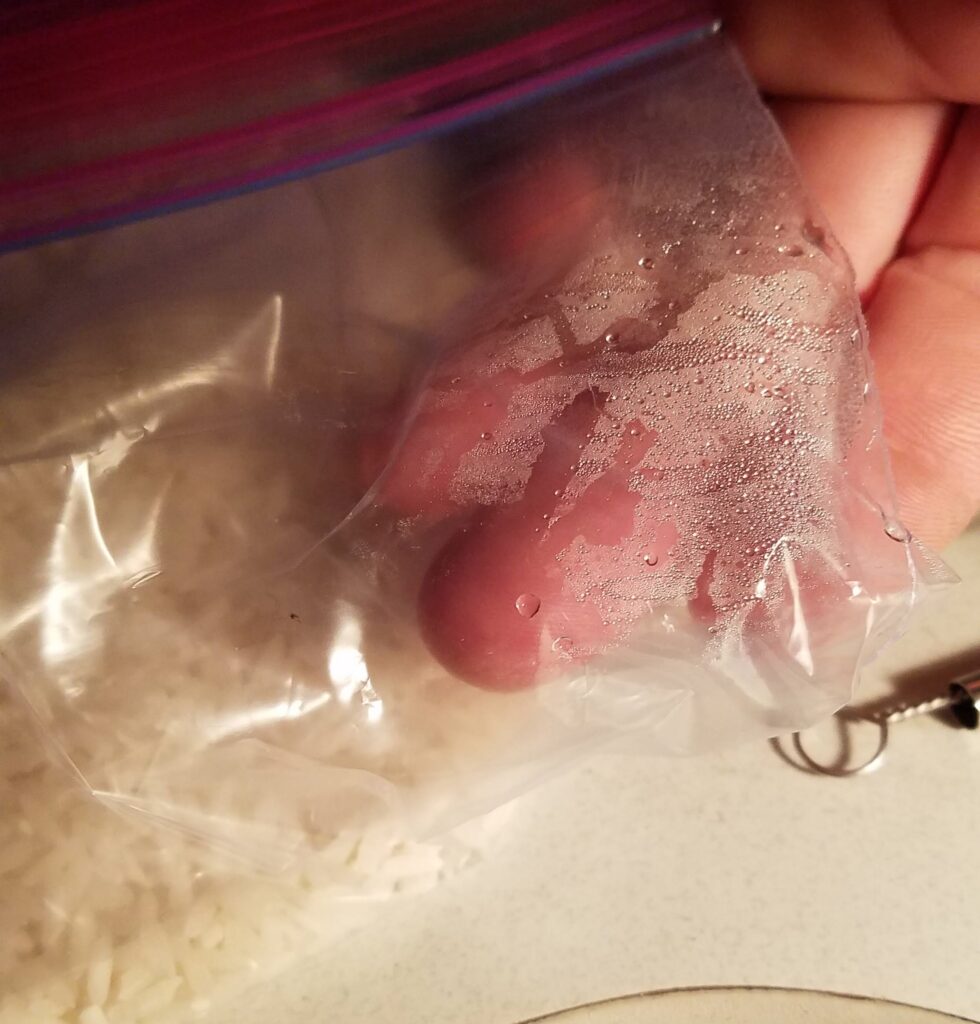
Can see to the left of the photo above that the moisture indicator has gone pink, in-case there was any question about water ingress. A little poking around online at some tear-down photos helped me locate the OLED connector location (under this strip of silver metal in the photo above). With a screen gone green, I figured something at the drive end was upset and should start there. A screw is hidden under the black adhesive, go digging.

Initial inspection looked grim. The PCB showed signs of power-on corrosion around the higher-voltage signals for the OLED screen and at the battery connector. Electrolysis is not out friend, the metal will disappear in short time given average water/moisture and enough voltage. I disconnected the battery connector and then the display (large rectangular connector center of image above). Utility knife blade for scale.
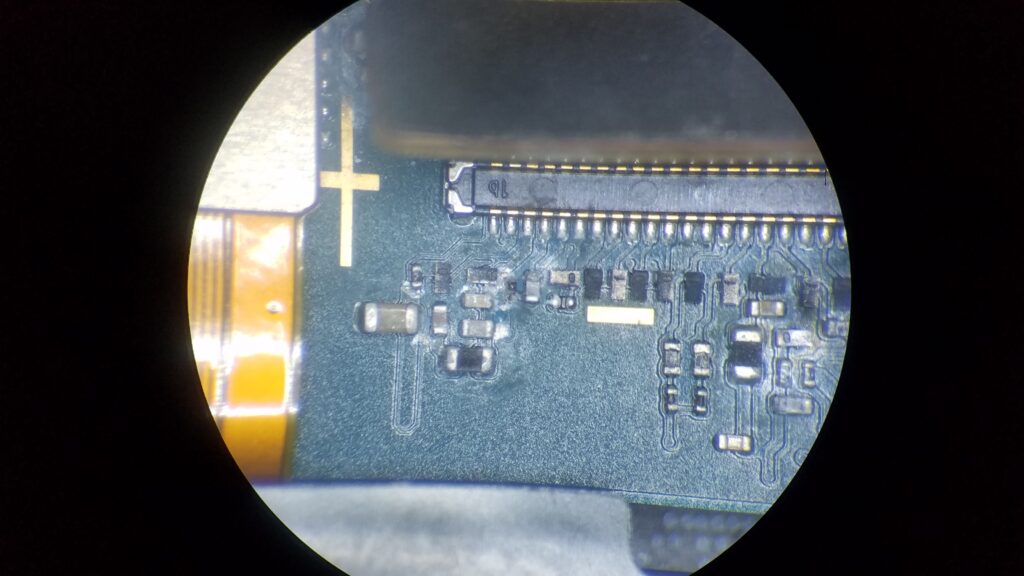
As visible above, things got unhappy here. Some poking around with my finest needle tip Pamona probes and a Fluke 87V told me everything I needed to know, the microscopic resistor centered in the photo above was still a resistor, coated in carbon and the remnants of it’s solder, no longer connected on the bottom lead. My experience in the past has been very poor getting SMT components that have undergone such corrosion to fully re-solder (usually ending with the ends/terminations ripping off), but I tried anyway. The finest Metcal probe and UltraFine tweezers were still gargantuan under my 10X WF Bausch & Lomb StereoZoom at full magnification. If you don’t own a high end iron with ultra-fine tips, don’t bother getting it anywhere near a modern cell phone PCB unless you’re expecting to toss it in the bin when you’re done.
After spending a good amount of time attempting to bring the resistor back home, even cleaning the landing pads and moving to leaded solder, it wasn’t going to happen. The resistance measured somewhere around 2-3ohms so I decided to see if a direct short of wire would do the trick. I picked a single strand out of some wire, tinned it, and stuck it down to what was left of the mangled pads. Even with the Metcal doing it’s best, the PCB’s don’t take kindly to anything but the soft caress of a pick-and-place/reflow-oven touching them. It is VERY easy to destroy traces, lift pads, break vias, and otherwise back yourself down a path of no repair.
Shorting wire placed, corrosion otherwise gently brushed of the board and potential shorts cleared, I reconnected the battery (and USB-C charger at this point) to see if it would come alive, sans green tint.
IT WORKED.
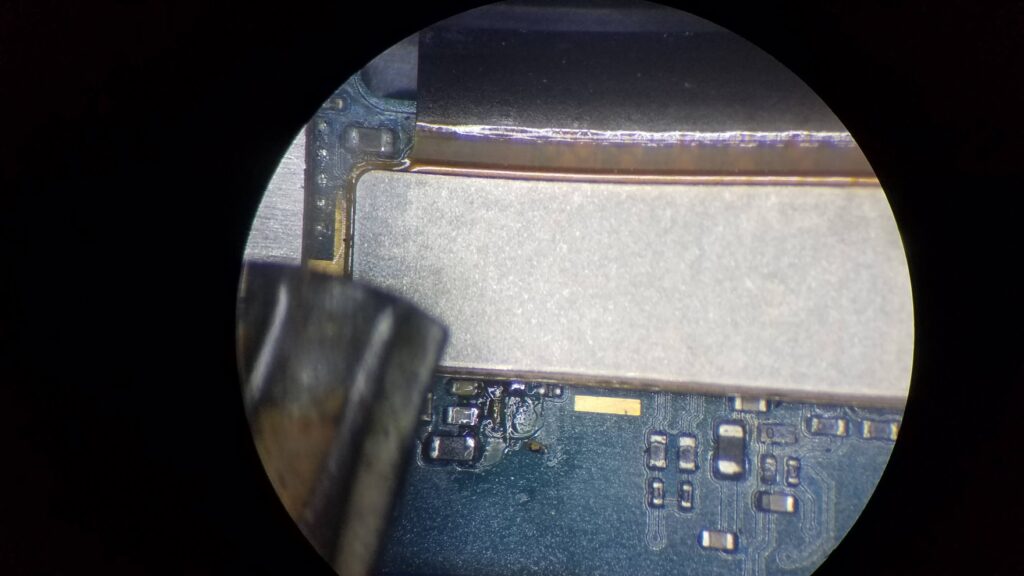
Barely visible in the mess of flux is the thin strand of wire bridging the pads. Just to the right and below the other components nearby is the removed [charred] resistor waiting to fall off the board into my carpet when I picked up the phone.
Overall the remainder of the phone internally fared alright, paying specific attention to clearing corrosion around any connectors, higher voltage areas, or burned spots. Under the battery flex-to-board connector was particularly unpleasant, and might explain why it drained so fast after getting moist.
A particular challenge was clearing water from in front of the front facing cameras. The ‘left’ camera (opposite the buttons) was very fogged regardless of heat and air application, returning after things cooled down. Before buttoning the phone back up, I removed one of the hold down screws, loosened the other, and gently lifted the offending camera far enough off the front glass to let the moisture slowly dissipate. Some heat, dry air, and waiting later, I put it back in place and secured it, confirming things were dry and clean. The rear camera fit nicely back into it’s void and appeared to not get any contamination on the lens.
I re-secured the cover after powering off the handset, connecting the finger-print reader, powering up, and confirming it still worked. I know there’s no chance I’m going to get close to IP68 with how the handset was already compromised due to being a ‘refreshed’ unit [likely a early unit that needed it’s rear camera replaced] so I used what glue was still usable, applied heat, and pressed everything back into place. Of particular note, I specifically attempted to avoid heating the battery as much as possible, knowing that these do not appreciate any extremes.
Upon further research, it appears that for a good number of modules within the device, replacement/service requires ‘splitting’ of a glued together speaker cavity, the reassembly thereof prone to create another major place for water to enter the handset if not done carefully. It appears that it is best to not rely upon the waterproofing, especially if you suspect the handset has ever been opened or any of the myriad of seals compromised. Water proof case might be the better option if rolling those dice.
Handset seems fully functional days later, save for a few new little scratches around the bezel on the back side (easily hidden by my Spigen case). The likelihood of water wicking into the back cover area is now greatly increased with my re-use of the old segregated glue so I’ll be on the extra careful road when it comes to placing the phone anywhere it might get more than sprinkled on. There seems to be no adverse effects associated with the resistor removal and replacement with a shorting wire. Time shall tell.
Thanks for reading!