PGE – Peak Time Rebates – Use Less Energy, not Zero!

Being recently made aware of the program offered by our local utility Portland General Electric, I decided to enroll in Peak Time Rebates and try my hand at saving a few bucks on the next bill (and lightening the load on the grid during some heavy-usage times). A couple opportunities presented themselves in late July, which I partook in, however have yet to see the benefits reflected on my bill (up to $1 per kWhr saved during the event, as per the PGE website).

A day prior to the first event, I received text & email notification of an upcoming Peak Time Event scheduled for 5-8pm July 21st, 2020. I decided to see if I could move my home power usage during the event to zero without any significant fallout. With ample warning, I prepared my various systems for 3hrs+ of offline time, ensuring that battery backed devices were up to the task and that the few non-battery backed devices were moved over to independent power sources. This was fairly easy given that I’ve been creating an overabundance of energy lately but have nowhere to send it (read as – not grid tied). The only large consumers in this category were items like refrigeration, fans, etc.

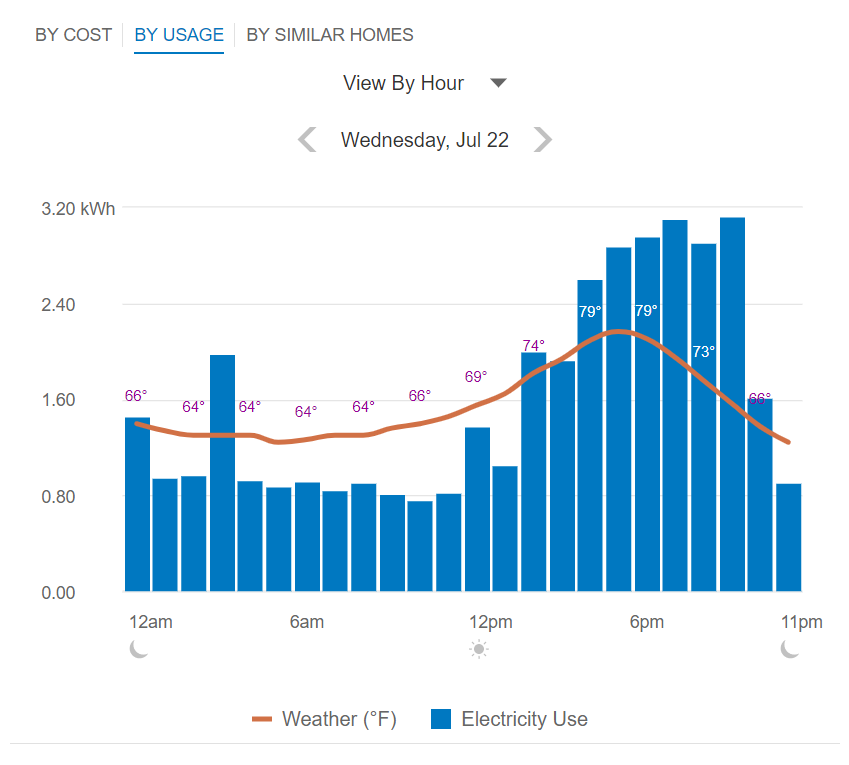
5pm on the 21st rolls up and I was a little late getting home so didn’t start shedding loads until closer to 6pm. Early in the second hour of the event I had reduced my energy draw to zero, without any adverse effects. This meant shedding the AC, Heat Pump Water Heater, Spa, items like that. Refrigeration was brought onto the independent solar grid for the duration of the event. The meter stopped ‘turning’. Yay!


Late to the Party

After 8pm passed, I powered back on the desired devices (AC, fans, water heater, etc) as can be seen in the graph. Temperature gain in the home was notable but not uncomfortable. My house, being built in 1915 has less than ideal forms of insulation in walls and ceiling (if any at all). Fortunately the finished basement remains it’s fairly standard 17-18C; a nice refuge if things get too warm on the main floor. I felt accomplished with the experiment and waited for news as to what my rebate savings would be (typically sent via email/text as well).

Those results never came.

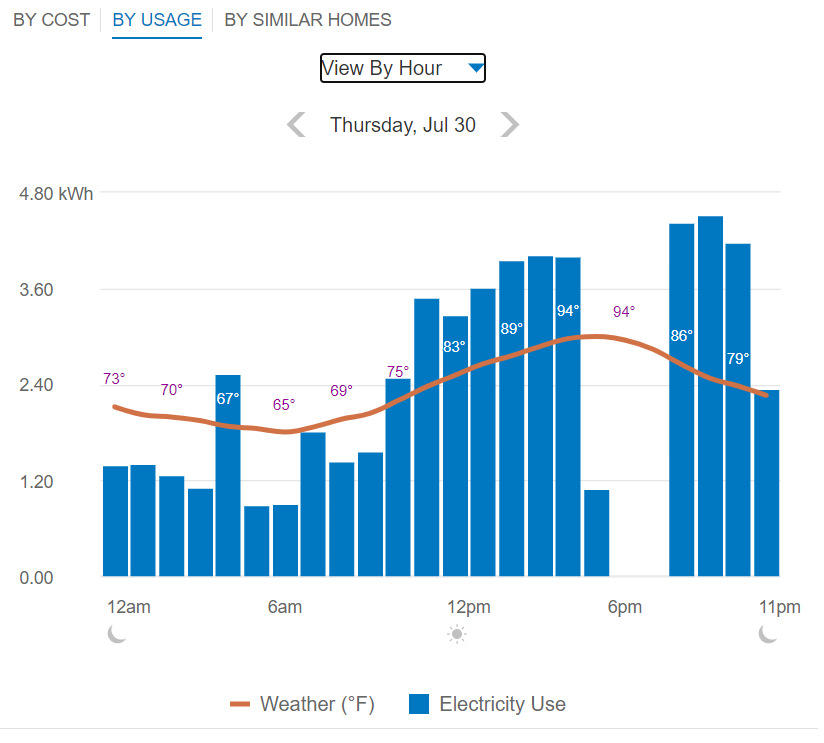
For comparison, the next day (typical high-end of power load for my home and accessories).

Typical Day as a Comparable

I didn’t think much of the event until I started hearing reports that other folks were receiving their rebate information (or that they didn’t reduce enough to qualify). Another peak time event text came through, this time for the 30th of July, so I prepared once again.

This round I was able to start earlier, though still a bit behind schedule due to some visitors. Similar setup, battery backed items were easily shed and the refrigeration moved to my alternative energy source. I made a nice big dent in the power draw during the 3hour window, raising interior temperatures 3-4C but still tolerable for inhabitants. Nearly hitting the zero-power-used mark for the time period, I felt fairly accomplished.

Fashionably late

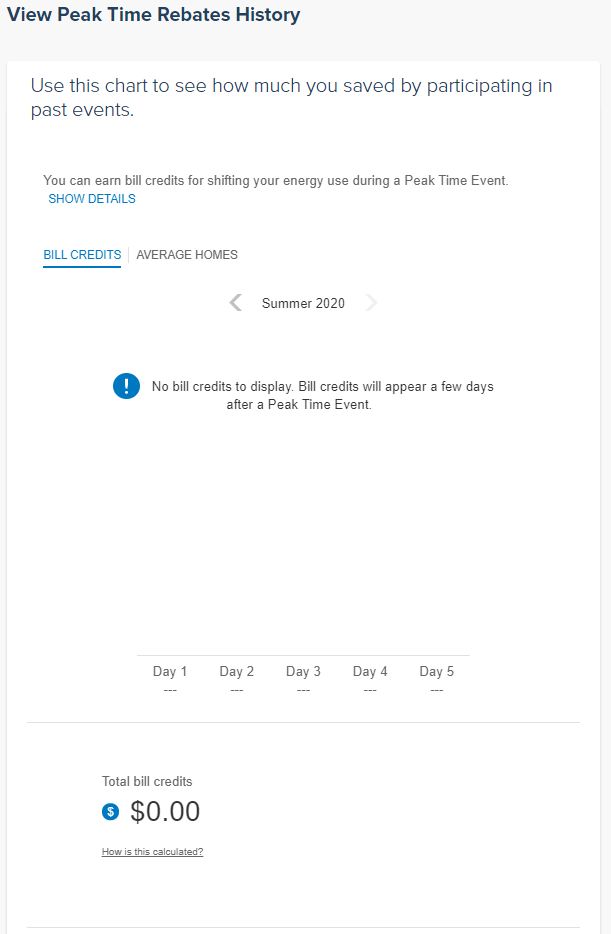
Fast forward to 2nd week of August, and I still haven’t heard the results of my efforts. Nothing on the PGE website about my peak time events being successful (or denied)…just a blank window.

…perplexing…

Bummer. Starting to wonder if their system ‘broke’ when it saw the zero and/or too-near-zero values that it flagged it requiring review before applying rebate. Given that the average layperson isn’t familiar with the small loads associated with wall-wart style power packs or smart device draw even when off, I guess I could understand. So I called PGE up.

The associated I talked to (Robert) was understanding and although a bit confused himself, had access to internal FAQ materials that advised him to let me know that zero usage during a time period makes the program assume there was a outage (or something of that sort?) that would render the data ineligible for the PGE Peak Time Rebates program. He kept asking “did you turn off the breaker?” Having not found anything indicating that zero usage would invalidate the rebate option, I was (and continue to be) confused but realize that this person likely won’t have the solution I’m looking for. I asked that if were able to flag my account for review AND also please present more accurate terms and conditions for the program on the website, it would be appreciated. Frustrated, but not going to take it out on a support person, I completed the call and pondered my next move.

Twitter?

I logged into my old Twitter account and searched for Portland General Electric, ready to shine some public light on my experience and see what comes of the effort. With little to loose other than them possibly deciding they don’t want to provide me energy anymore, I figured it was worth a shot.

I guess this is what we do these days?

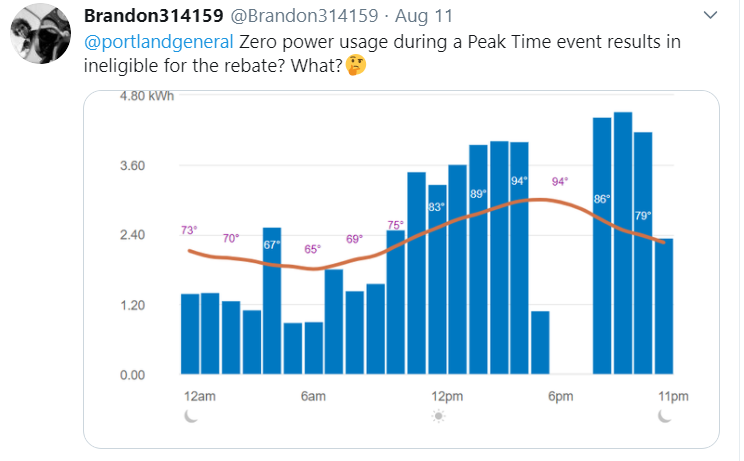
I was contacted publicly by a representative (Sonja) who explained eloquently:

Helpful information, but not on their website or terms…

A bit of back and forth ensued, and the end result was that I was forwarded to Elaine, who was putting my situation in front of an Advisor and they would be contacting me soon. Fingers crossed for some resolution? I’ll update as I find out more.

Update:
Pinged them again on Twitter and got a reply later that day:

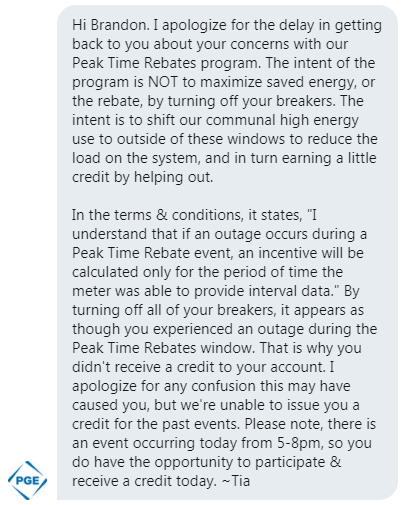
Even though my meter was indicating data (in some cases zero, some – reduced usage) apparently PGE will flag the period as an ‘outage’ if there is zero kWhr used during any of those hour blocks. This decision is in reply to disclosing that my ‘essential’ home loads were powered alternatively and anything battery backed was effectively ‘shifting’ the draw outside the window, charging batteries after and precisely meeting the goal the outlined for the program.

The summary? If you’re going to save energy, make sure you don’t save too much.

2008 ML320 CDI w164 Rear Hatch Latch/Lock Repair

A common problem with the w164 chassis is the auto-pull-in electric rear hatch latch. These are known to fail, especially if the user operates the door without using the open/close assist hydraulic system (button/remote versus lowering by hand). The end result is a rear door latch that won’t open, close, or latch properly resulting in error messages and an unsafe condition. These little latches are very spendy and have gone through a few revisions. Not being one to give up easily and buy new parts, I wanted to see if I could have a go at fixing mine. The issue as I saw it first appear was that the door wouldn’t ‘pull in’ and fully latch. No amount of forcing would close/latch the door either so this was a safety issue worth fixing immediately.

I tore the rear panel off the rear hatch door, removed the three Torx screws, the emergency exit latch cable, disconnected the latch mechanism and pulled it out. What I found is below…a device that you must destruct to open and is not able to be re-assembled without additional ‘stuff’.

I despise plastic welds

I started by cracking open the upper ‘plastic’ case by removing the tops off the plastic welds. A myriad of parts were inside, hopefully able to be replaced properly without issue when I’m done. The bigger issue was removing the middle body from the lower unit, as there is a flag arm/cam that engages with the metal bits of the latch and this has to be indexed ~200 degrees around to pass through an ‘assembly slot’. They clearly made this device to only go together, not come apart. Some tinkering with a few probes and flashlight I was able to rotate the mechanism and fully disassemble.

Backlash is loose with upper cover removed
This interesting bit swings into action with one motor direction for pull-in latching but allows free operation of the mechanism once latched (so it doesn’t hang up on release)
More internal bits, the other end of the shaft on the left is missing something…

Lots of grease, complex components, but fairly well built. I started to poke around and found the issue fairly quickly, I had two pieces where there should have been one. I unstacked the gear train, spacers, etc and set them aside on a clean surface and extracted the closing mechanism shaft.

Well dang…

This item had a pretty ugly shear failure right where the shaft leaves the housing (and associated bearing support). That is a difficult fix as ‘gluing’ this joint would just result in an immediate failure. I’m going to need to add some strength, or build an entire new shaft out of something else. I opened to try the former.

Milling machine to the rescue!

I chucked the two pieces up in the mill and started removing metal. I also drilled the center of the shafts to fit a piece of drill rod for reinforcement purposes when it came time to assembly. This shaft needed to resist some pretty knarly torsional loads so I drilled deep.

Clean alumium

Tossed in the drill rod, did a dry test fit, and things are looking pretty good. Getting the bores perfect drilled/aligned was a challenge HOWEVER the gear that resides on the bottom (cam) side of the shaft has nothing specific about what it indexes with. The result was rotating the two halves before assembly to achieve the best co-axial configuration, making sure the two halves don’t push too far apart due to the un-clean shear.

Ugly but it might work

Now it’s time for the JB Weld. I mixed up a small batch of the Quick Set after visiting my friend in the middle of the night, me unable to find my stash of two-part epoxies. Little bit of helping hands later and confirming the coaxial rotations, I assembled and confirmed length against ‘expected’ length gathered from pre-milling measurements.

Time to dry

Once the shaft had some time to set up, I re-assembled the whole stack and indexed things back in their proper locations. The largest remaining hurdle was figuring out how to re-secure the upper housing plastic button welds that were now gone. I tried melting things but ultimately the solution was a bit less elegant.

Mercedes Latch Shibari!

The latch has been performing well for a number of weeks now, hopefully continuing to do so for quite some time. I have my eyes out for another broken latch assembly to repair and have at the ready if the need presents itself. While the construction of the latch is fairly decent, the serviceability is far below my expected standard for Mercedes hardware, though this is a Huf brand mechanism (the supplier for Mercedes latches/locks/keys).

Thanks for reading along!

w164 2008 ML320 CDI Rear Brakes Time!

After many weeks of “Brake Pads” warning on my city driver, it was time to install the new rear brake components I’ve been sitting on. On the docket were two new rear rotors, rear brake pads, and wear sensor.

Tire Removed, old rotor/pads

After removing the caliper, safely hanging not by the hose, pulling the pads, and removing the rotor retaining bolt, I pulled the rotor out and off the car. I compressed the caliper piston back in to allow for installation of the newer-thicker pads.

Rear hub, emergency brake visible
Rotor removed, pretty worn

I confirmed free movement of the emergency brake adjuster and blew all the loose dust/etc. out. This will enable me adjusting the emergency brake ones the new rotors are on. Inspected the old pads and wear sensor, definitely touching down. This wear sensor busted as I was trying to pull it before photoing.

Wear sensor into the metal

Comparison of the old pads and new, quite a difference. Note that the wear sensor isn’t installed yet in the new pads.

Got the moneys worth

Reassemble the brake system, rotor first and install the small bolt. I tend to put a small amount of anti-seize on the touchdown points on these because the wheel retains them and they’re only there to hold things in place and indexed while the wheel is off/loose. Additionally they tend to be VERY hard to remove. A little blue locktite works too.

Reusing the old bolt, yep.

Caliper back on next, compressing the piston to allow for the new pads is important. Push slowly, and sometimes fluid may need to be bled while doing this to prevent issues with up-stream ABS components. Checking out the caliper slides while here is not a bad idea either. These single piston calipers need to ‘float’ on the rotor to work properly. Here in the PNW our cars don’t get heavily salted so most of these components are good for the life of the vehicle if driven and maintained regularly. Check condition of hoses as well while here. Adjust the e-brake through a lug-bolt hole…tighten until rotor won’t turn then back off until just barely dragging. Confirm after doing both sides that the e-brake pedal engages near the top half.

Reassembled!

Remembering to install and re-connect the wear sensor is important. Routing the wires where they will not get cut up or damaged by the spinning rotor is also important. Don’t forget the anti-rattle clip on the caliper when you’re done!

Thanks for joining in for what was a pretty straight-forward repair, documented for your pleasure.